• about lidia

ohlidia

~ Life is Delicious!

ohlidia

Category Archives: Vegetarian

My Dad’s Risotto con Porcini

21 Tuesday Jan 2014

Posted by ohlidia.com in Mains, Recipes, Vegetarian

≈ 88 Comments

Tags

mushroom risotto, porcini mushroom risotto, porcini mushrooms, risotto, risotto con porcini, vegetarian risotto

IMG_6327

Having been pretty much raised by my dad, most of what I know about Neopolitan food comes from him. My mom passed away when I was 8 years old, which left my father to raise 3 children on his own. Having lived most of his life being cared for by either his own mother or his wife, he suddenly found himself on the other side of the table. Not knowing much about cooking, he had no choice but to jump in blindly and make sure we were fed. And fed we were!

He was an amazing cook. Truly. I can clearly remember his oh, so delicious stuffed peppers, which to this day I cannot seem to recreate. Perhaps I’m chasing a futile memory. And his lasagne. He would wake up early Sunday morning to make his tomato sauce. Then he would patiently roll tiny little meatballs to fill his lasagne with. Out of this world! I’m not sure how he managed to make such delicious food and I was too young to realize at the time what an undertaking this must have been for him. Fortunately, he was able to retire in his early 40’s to take care of me. I say fortunately, but it did come at a price. Having left Italy after World War II to work in the coal mines of Belgium, he was able to receive a substantial Belgian pension all because of his sick lungs.

One of my favourite dishes that my dad made was his Risotto con funghi Porcini. Porcini mushroom risotto. I’m not sure how he came to make such a delicious Northern Italian dish, but oh man it was good! So much so that I would request that dish as my birthday meal time and time again. It was the last birthday meal he made for me, when I was pregnant with my first, before he passed away. In my mind, I never imagined my dad not being there. I took it for granted that he would always make his risotto for me and therefore I never learned how he made it. Lucky for me though, my hubby did. Hubby would sit at the kitchen table and watch my father make his risotto. He watched and took notes of everything my dad did, timing his every move. And I am ever so thankful. It was hubby who took over with the making of this favourite dish of mine. There were many birthdays that I requested this dish and hubby came through every time. Funny thing is, I never made this dish myself. I can’t explain why. It’s my comfort dish. And I think it was all the more comforting because it was made by my dad, and then my hubby. Last night, I finally came around and decided to have a go at it. And you wouldn’t believe what hubby said. “Wow! It’s better than the one I make. Your dad would be really proud!”.

My Dad’s Risotto con Porcini

4 or 5 tablespoons of extra virgin olive oil

1 yellow onion, minced

2 or 3 shallots, minced

Dry porcini mushrooms, a small handful

2 cups of Arborio, Carnaroli or Vialone Nano rice

½ cup or so of white wine

6 to 7 cups of chicken stock, warm

1 cup of grated Parmigiano Reggiano, maybe a little more

Salt & pepper to taste

IMG_6266IMG_6290

A few notes on the ingredients. You can use frozen porcini if they’re available, although I found them to be nowhere as flavourful as the dried porcini. If you’re lucky enough to have fresh porcini where you live, by all means use them.

IMG_6252

I mentioned 6 to 7 cups of warm chicken stock. Because I use the soaking water of the porcini mushrooms, which I encourage you to do seeing as all the mushroom flavour is in there, I really only needed about 6 cups of stock. My theory when it comes to cooking with wine: use one good enough that you would drink. Trust me when I say there’s nothing better than having a glass of wine while making this risotto as you pretty much need to hover over it and constantly be stirring. It’s really not that bad if you’re sipping a good wine! My dad made his own wine and therefore used his, which was a heavy-bodied wine. I use whatever white wine I have on-hand, which this time around happened to be a BC Chardonnay from the Okanagan Valley, Mission Hill.

IMG_6280

Begin by soaking the dry porcini mushrooms in a small bowl with about 3/4 cup to 1 cup of warm water. Let soak for about 15 minutes and then chop the mushrooms, reserving the mushroom water.

IMG_6258 IMG_6261

IMG_6292

In a medium-sized pot, heat the olive oil over medium heat and add the onion and shallots. Sauté for about 5 minutes. Stir in the mushrooms, and then add the rice, stirring, ensuring that it gets coated with oil.

IMG_6299 IMG_6301

After about 3 minutes, add the white wine and stir. Wait until it has been absorbed by the rice, and then add the mushroom water. Once that has been absorbed, begin to add the warm chicken stock, ½ cup at a time. My ladle holds about ½ of liquid so it worked out perfectly. As you add your ½ cup of stock, you do need to keep stirring. I mean you need to constantly keep stirring, until the liquid has been absorbed. Continue to add ½ cup of stock at a time, stirring constantly, until the rice mixture is creamy and al dente. This will happen after about 6 cups of stock, but do check it after 5 ½ cups.

IMG_6307

Once it’s done, al dente, remove from heat and stir in the parmesan. Check for salt and season with pepper. Serve immediately, sprinkled with freshly grated parmigiano over the top. Oh, so cheesy-creamy yummy! Mmmm!

IMG_6332

IMG_6327

IMG_6331

0.000000 0.000000

Share this:

  • Twitter
  • Facebook
  • Pinterest
  • Email
  • Print

Like this:

Like Loading...

Wheat, Sugar & Dairy-Free Banana Porridge

13 Monday Jan 2014

Posted by ohlidia.com in Breakfast, Recipes, Vegetarian

≈ 46 Comments

Tags

banana porridge, coconut porridge, coconut-banana porridge, dairy-free breakfast, dairy-free porridge, Danielle Walker, gluten-free breakfast, gluten-free porridge, porridge, wheat-free breakfast, wheat-free porridge

IMG_6193

It is the start of a new year. And with the start of a new anything, we all like to begin things on the right path. Right path might not be the appropriate word here, perhaps more like a different path. I don’t believe in making New Year’s resolutions. They don’t work for me. And rather than make some and then feel like I’ve failed, I just don’t make them. I also believe that every day of every year should be no different than New Year’s day. Every day should be a new beginning, one where I try my very best.

Then the New Year rolls in. And like it or not, I do feel like it’s a chance to start fresh. Forget the past year, time to move on. And without making those impossible-to-stick-to resolutions, I tell myself that I will try my best. Try my best to be a better person. Try my best to find my way. To make different choices. To make healthier choices.

Making healthier choices usually involves food, and with the help of a new cookbook which I received as a Christmas gift, I look forward to making different choices with my meal planning. Not all the time, just sometimes. Against all Grain, by Danielle Walker, is a book consisting of gluten-free, grain-free & dairy-free recipes. After a quick glance at most recipes, I also noticed that they are sugar-free, with natural honey being the sweetener of choice. Danielle also blogs at againstallgrain.com, where she posts lovely recipes and chronicles her recovery from an autoimmune disease.

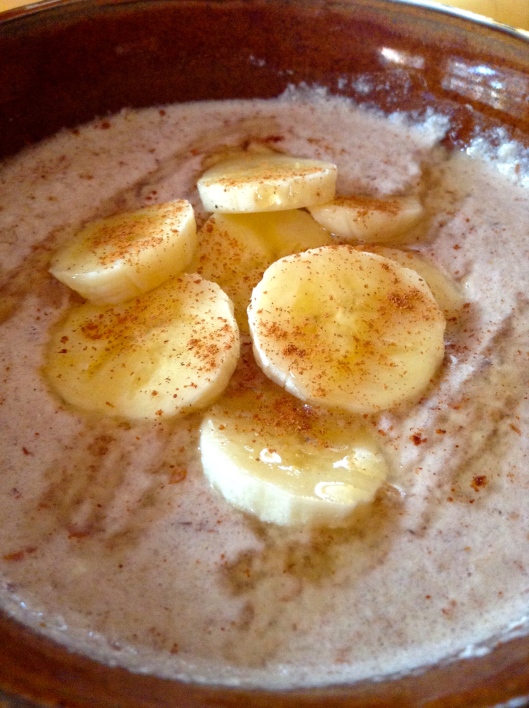
So, talking about new beginnings and starting fresh, I would like to share with you from Danielle’s book a delicious start to your day. Banana porridge. Both my daughter Charlotte and I just loved this porridge, welcoming its warmth and richness on the arctic mornings we’ve been having.

Banana Porridge

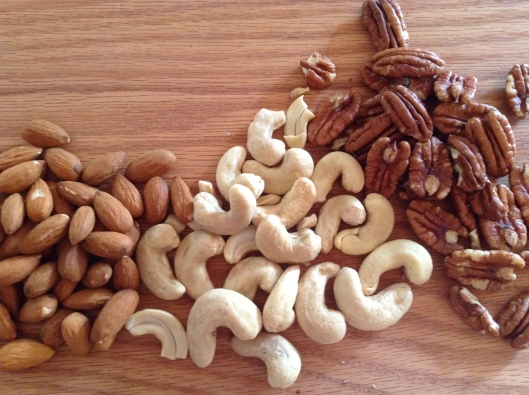
½ cup of raw cashews

½ cup of raw almonds

½ cup of raw pecans

Pinch of sea salt

2 cups of coconut milk

1 ripe banana

2 teaspoons of cinnamon

IMG_6220IMG_6228

Place the nuts in a large bowl and sprinkle with sea salt. Add enough cold water to cover the nuts by at least 1 inch. Cover and let soak overnight. Drain the nuts and rinse 2 or 3 times, until the water runs clear.

Add all the ingredients to a food processor and process until smooth. Pour the porridge into a saucepan and heat over medium heat for about 10 minutes, until warm and slightly thickened. You can eat as is. Or you can add some sliced banana, a sprinkle of cinnamon and drizzle with some honey. Oh, how yummy!

IMG_6171 IMG_6183IMG_6185
IMG_6207
IMG_6208

0.000000 0.000000

Share this:

  • Twitter
  • Facebook
  • Pinterest
  • Email
  • Print

Like this:

Like Loading...

Lasagne di Zucchine

27 Tuesday Aug 2013

Posted by ohlidia.com in Mains, Recipes, Seasonal, Vegetarian

≈ 50 Comments

Tags

Italian, lasagne, seasonal Italian, Vegetarian, vegetarian lasagna, vegetarian main, zucchini, zucchini lasagna, zucchini recipes

IMG_4100

This isn’t your traditional lasagne. First off, there’s no pasta. Instead, I’ve used thinly sliced zucchini to replace it. It has been so hot here in Montreal, every visit to the cottage brings an abundance of zucchini. They just love the heat, don’t they? Funny how only the yellow ones have come up. Not a single green one. No worries though. I think the yellow ones are so vibrant, bringing to mind summer and sunshine. I need to find creative ways to use up this yellow bounty so that my family doesn’t tire of it. Warning: yummy zucchini recipes coming your way!

IMG_4038

The beauty of this dish is that all the ingredients are fresh! No pre-cooking of anything. Straight from the garden and into the oven! Served warm, at room temperature, or even cold for an al fresco meal. You decide. Whichever way you choose, I promise that you’ll have the taste of summer in every bite! Buon appetito!

Ingredients

2 medium sized zucchini, about 2 lb.

2 large tomatoes

2 balls of fresh mozzarella, or mozzarina, about 1 lb.

1 cup of bread crumbs

1 cup of grated Parmigiano Reggiano

Fresh basil, chopped

Fresh Parsley, chopped

4 eggs

Salt & pepper

Extra Virgin Olive Oil

I was out of bread crumbs, so I made my own. One thing you can always be sure to find in my pantry is old bread! To the bread crumbs, add some freshly chopped basil and parsley, the Parmigiano Reggiano, salt and pepper to taste. If you’d like to make this dish entirely gluten free, you could replace the bread crumbs with parmesan, upping the amount to 2 cups. I only thought of this after the dish was made but I will definitely give it a try next time.

IMG_4032IMG_4036

Slice the zucchini as thinly as you can, paper thin if possible. I used a mandolin to make things quick and easy. Do the same with the tomatoes and the fresh mozzarella.

IMG_4041IMG_4052IMG_4054 IMG_4057

You can now begin layering the lasagne. Pour a little olive oil in the bottom of an oven dish measuring more or less 11 inches by 14 inches. Cover the bottom with the zucchini slices. Add the mozzarella on top, followed by the tomato slices. Sprinkle with the bread crumb mixture and finish by drizzling a little olive oil over the top. Repeat the layers so you have 3 filled layers. The fourth and final layer of zucchini slices will be topped only with mozzarella and the bread crumb mixture, drizzled with olive oil.

IMG_4062 IMG_4063IMG_4064

Finally, beat the eggs and season with salt and pepper. Pour the mixture over the top. Bake in a 350 degree F oven for about 45 to 50 minutes. Allow to cool on the counter at least 30 minutes before serving. Enjoy!

IMG_4071IMG_4073

IMG_4079 IMG_4099

IMG_4102 IMG_4109

Recipe adapted from Julia della Croce, “Vegetarian Table: Italy”.

45.508840 -73.587810

Share this:

  • Twitter
  • Facebook
  • Pinterest
  • Email
  • Print

Like this:

Like Loading...

Zucchini and Buffalo Mozzarella Bundles

09 Friday Aug 2013

Posted by ohlidia.com in For Starters, Recipes, Seasonal, Sides, Vegetarian

≈ 27 Comments

Tags

appetizers, buffalo mozzarella, seasonal, Vegetarian, zucchini, zucchini sides

IMG_3375

If you grow your own zucchini, you’re probably starting to have an abundance of them right about now.  I know we are.  Green ones.  Yellow ones.  I’ve been enjoying our zucchini in many different ways this past week.  And if you do grow them, check out my Awesome Blossoms post and make use of those delectable zucchini flowers.  Fiori di zucchini.  They are a favourite summertime treat in our household.

Another favourite in the summertime is putting out an array of various nibbles on the table and making a meal of it.  With good friends.  Crusty bread, cheese, olives, roasted peppers, eggplant, tomato and cucumber salad, prosciutto, and these little zucchini bundles.  Stuffed with blissful buffalo mozzarella, a cheese made in Italy with milk from the water buffalo, and fresh basil leaves.  Perfect summertime treat!

Ingredients

Green and yellow zucchini

Mozzarella di Bufala, or fresh mozzarella

Fresh basil leaves

salt

Extra Virgin Olive Oil

IMG_3332

Bring some water to a boil in a medium pan and plunge the entire zucchini, whole, into the water for 3 minutes, 4 minutes for larger zucchini.  The reason for this is because the zucchini, once thinly sliced, needs to be pliable enough to roll. I tried without boiling first and I wasn’t able to roll them into little bundles.  Remove zucchini from the water and place in a colander, running cold water over them for a few minutes.

When cool enough to handle, slice as thinly as possible.  I used a mandolin at the smallest setting.  Lay out the slices on a tea towel and cover with another towel, allowing for the water from the zucchini to be absorbed.  Let sit until ready to roll.

IMG_3344

Pat the buffalo mozzarella dry with paper towels.  Chop into small bites, no wider than the zucchini slices.  Chop or tear the fresh basil in similar sizes. 30 minutes before serving, roll into little bundles.  Sprinkle the slices lightly with salt, place a basil leaf on one end of a zucchini slice and add the mozzarella on top.  Roll into a bundle and place on a dish.  Drizzle with Extra Virgin Olive Oil and serve immediately.  Buon appetito!

IMG_3351IMG_3368IMG_3370IMG_3371

IMG_3372IMG_3376

IMG_3378IMG_3379

Share this:

  • Twitter
  • Facebook
  • Pinterest
  • Email
  • Print

Like this:

Like Loading...

Pasta with Asparagus

27 Thursday Jun 2013

Posted by ohlidia.com in Kid Friendly, Mains, Recipes, Seasonal, Vegetarian

≈ 25 Comments

Tags

asparagus, asparagus pasta, kid-friendly pasta, lemon pasta, pasta, vegetarian pasta

20120611_348

We finally have an abundance of Quebec asparagus. I realize it’s summer, but the asparagus crop available to us up until about 3 weeks ago was mainly from our neighbour down south, the USA. Our season for local produce comes a little later than usual because of our colder climate. The farmers’ markets and grocers’ are now inundated with our own local fare. And how beautiful they are! Thin asparagus, thick ones, even wild, wispy asparagus sold right out of the back-end of a truck. We love asparagus in our household. Steamed and served cold as a salad, drizzled with olive oil and lemon. Roasted in the oven with olive oil. And our all-time favourite, marinated with olive oil and balsamic vinegar and then thrown onto the barbie.

A few weeks ago I came home with 2 large bunches of asparagus. I grilled them all on the barbie, thinking of the left-overs which I would add to some sandwiches, along with some aged cheddar and sliced pears. We were in the country at the time and burgers were on the menu. I was saving my asparagus for last. I managed to pop 2 or 3 spears into my mouth as I left the kitchen. When I returned 20 minutes later for my serving of asparagus, they were gone! I called out to hubby, “Where did you put the asparagus?”.  “I ate them,” he called back. To which I replied, “You ate them ALL? Well, you better make sure to flush when you go to the loo!”.

20120611_282 20120611_304

Pasta with Asparagus

2 bunches of asparagus

2 lemons

1 package (1 lb/450 g) of pasta of your choice, I used Fusili

Extra Virgin olive Oil

Parmigiano Reggiano, 1 cup grated, plus more for serving

Salt

This really is a dish which allows you to adjust the seasonings to your own taste. Begin by removing the tough stem-ends of the asparagus. Chop them into 1 or 1 1/2 inch pieces. Steam them in a double boiler for about 4 minutes. I enjoy a slight crunch to my asparagus. You can also boil them for the same amount of time. Drain and set aside.

20120611_309

20120611_307

Bring some salted water to boil in a large pot and cook the pasta. As it cooks, zest 1 lemon and set aside. Juice the 2 lemons. Grate some Parmigiano Reggiano. I used about 1 cup, but you can adjust the amount to suit your own taste.

20120611_33420120611_32020120611_339

When the pasta is done, or al dente, drain and pour into a large bowl. Drizzle the pasta with extra virgin olive oil, about 3 or 4 tablespoons. Add the cooked asparagus, lemon zest, 1/2 of the lemon juice and a sprinkle of salt. Add the Parmesan cheese and give it a stir. Taste for salt and lemon. If you like it a little more lemony, add the rest of the juice. I usually add about 1/2, and then another little drizzle. I like to add some Parmesan shavings, just because we LOVE it! Serve and enjoy!

20120611_34620120611_342 20120611_34720120611_351

Share this:

  • Twitter
  • Facebook
  • Pinterest
  • Email
  • Print

Like this:

Like Loading...

Mediterranean Couscous Salad

29 Monday Apr 2013

Posted by ohlidia.com in Kid Friendly, Mains, Recipes, Salads, Vegetarian

≈ 17 Comments

Tags

couscous chickpea & feta salad, couscous chickpea salad, couscous salad, vegetarian couscous salad

IMG_2185

Occasionally, I am at a loss when it comes to packing lunch for the girls. They love salads, which I do send them to school with, and they love couscous. What better lunch than combining their favourite foods with couscous and making a salad of it? Not to mention a healthy one! It makes a great after-school snack as well. And a nutritious one for anyone training for a marathon, such as my blogger-friend Teresa, over at little poppits.

Ingredients

1 1/2 cups of couscous

1 can of chickpeas, 15 oz/425 g

Cherry tomatoes, halved, about 1 cup

1/2 a cucumber, peeled and chopped

Crumbled Feta cheese, 1 cup

5 Green onions, chopped

Raisins, a handful or about 1/2 cup

Fresh mint, chopped, a handful

IMG_2153

Bring 2 cups of water in a pot to a boil. Add the couscous to the boiling water, stir, remove from heat and cover. Let stand for 15 minutes. Fluff with a fork and pour into a large bowl.

IMG_2158

IMG_2144

Add all of the ingredients to the couscous and stir gently. Make the dressing.

IMG_2159IMG_2162

Dressing

3 tablespoons of Extra Virgin Olive Oil

Juice of 3 limes, or 1/3 cup

Freshly grated ginger, 2 teaspoons

1 Garlic clove, minced

3/4 teaspoons ground cumin

1/2 teaspoon of sugar

1/2 teaspoon of salt

Freshly ground pepper

IMG_2172IMG_2169

Pour the dressing over the couscous salad, stir gently and enjoy!

IMG_2193
IMG_2181
IMG_2191

Share this:

  • Twitter
  • Facebook
  • Pinterest
  • Email
  • Print

Like this:

Like Loading...

Baby Artichoke, Celery & Parsley Salad

22 Monday Apr 2013

Posted by ohlidia.com in Recipes, Seasonal, Soups & Greens, Vegetarian

≈ 26 Comments

Tags

artichoke & celery salad, artichoke salad, artichokes, baby artichoke & celery salad, baby artichokes, seasonal salads, spring salad

IMG_2311

I do believe the Goddess of Spring has accepted my offering of the Pastiera Napoletana and blessed Montreal with spring! I awoke yesterday to sunshine and clear blue skies. Today was glorious! A repeat of yesterday, only much warmer. Connor, a fellow blogger over at One Man’s Meat, actually claimed that I had caused spring to be sprung all the way in Ireland! The arrival of spring will finally allow Ingrid, from now at home mom, to get outdoors and do what she does best: be crafty! And now I send this Spring Goddess over to Wisconsin, for Melissa over at Motherhood Is An Art (it truly is with her!), for I know it will make her quite happy!

Now, on with my salad! After the dinner I had last night, I was in dire need of a light, fresh and green salad today. I will keep the description of my extravagantly decadent meal for a future post. For now, suffice it to say that it was a caveman’s, or cavewoman’s, fat-laden, brimming with richness and maple syrup kind-of dinner! Enough said.

Ingredients  a salad for 1

slightly adapted from the book Simply Organic

6 baby artichokes

Juice of 1 lemon

2 celery stalks, thinly sliced

Sliced red onion, to your liking

Large handful of Italian parsley, about 1/2 cup, stems removed

1 tablespoon of capes, coarsely chopped

2 tablespoons of extra-virgin olive oil

Dash of Tabasco

Salt, to taste

Freshly ground black pepper

IMG_2272

IMG_2300

Begin by pouring the lemon juice in a bowl. Clean the artichokes. Pull away the outer leaves until all that remains is the very light and tender leaves inside. You’ll need to trim the ends as well until you reach the tender part. If the tips of the remaining artichokes are a tad sharp, just cut them off. Slice the trimmed artichokes thinly and add to the the lemon juice, tossing well. This will prevent them from turning brown, which happens within minutes. And in case you’re wondering, baby artichokes have no chokes to remove. The interior is tender enough to eat as is!

IMG_2292IMG_2291

IMG_2293

IMG_2297

Add the celery, onion, parsley, capers, olive oil, Tabasco, and salt and pepper to taste. Toss gently. Allow to sit for 5 minutes and serve at room temperature. It truly is a springtime salad!

IMG_2303IMG_2304

IMG_2311
IMG_2313IMG_2314

Share this:

  • Twitter
  • Facebook
  • Pinterest
  • Email
  • Print

Like this:

Like Loading...

Three Cheese Baked Penne with Roasted Butternut Squash

08 Monday Apr 2013

Posted by ohlidia.com in Kid Friendly, Mains, Recipes, Vegetarian

≈ 26 Comments

Tags

baked pasta, baked pasta with roasted butternut squash, baked penne, baked penne with Italian cheese, cheese baked pasta, cheese baked pasta with roasted butternut squash, pasta with roasted butternut squash, vegetarian main

IMG_1610

The girls and I love our pasta. Pasta in all shapes and sizes. Simple pasta with a Neopolitan tomato sauce. Filled pasta. Pasta with pesto. Or pasta with butter and freshly grated Parmigiano Reggiano. One of our favourites has got to be pasta al forno, or oven-baked pasta. Cooked rigatoni or penne, tossed with a simple tomato sauce and fresh mozzarella, baked in the oven.

I wanted to try something different with the baked pasta. A play on mac & cheese, which I’m sure anyone with children knows all about. Something between mac & cheese and baked pasta. Only better. Penne with three Italian cheeses and the addition of roasted butternut squash. Oh yeah!

I began by chopping one whole butternut squash into bite-size pieces and threw it into a roasting pan. I doused it with some extra virgin olive oil, salt and pepper, a little thyme, and into the oven it went at 350 degrees F/180 C for about 45 minutes, or until tender.

IMG_1553

IMG_1557

IMG_1587

While the butternut squash was in the oven, I put some water to boil for the pasta. One package, 450 g, of your favourite pasta. Rigatoni works well, as do penne. My personal favourite are pennette rigate, a smaller version of penne. Rigate is the Italian word for ridges, which run along the pasta as seen on rigatoni and penne. The ridges help sauce adhere to the pasta instead of sliding off. It’s all about texture, really.

IMG_1585

As I waited for the water to come to a boil, I proceeded with grating the cheeses. You can use your own favourites here and it doesn’t have to be three varieties. One or two would work just as well. I chose Piave del Friuli, Asiago Pressato and Parmigiano Reggiano. Piave del Friuli is a cow’s milk cheese made in Treviso, in the Veneto region of Italy. It is aged for about 16 months and its flavour is rich and creamy with a delicious nuttiness to it. Asiago Pressato is also made in the northern region of the Veneto, in a town called Asiago. Asiago Fresco or Pressato, fresh or young, is a semi-soft cow’s milk cheese aged for only 30 to 40 days, making it great for melting. It is buttery in texture and slightly sweet with a bit of a tanginess to it. This cheese would make a lovely grilled cheese sandwich. And of course, Parmigiano Reggiano which is a must with all pastas. Fontina from Valle d’Aosta would also be superb in this. I used about 150 g of each cheese for 1 package of pasta.

IMG_1572

IMG_1569

IMG_1573

At this point, the water came to a boil and in went the pasta. It’s important to cook the pasta al dente, perhaps even a minute or two just before al dente as it will go into the oven for about 30 minutes and cook a little more. As the pasta was cooking, I began to make a besciamela, or béchamel sauce.

BESCIAMELA

6 tablespoons of unsalted butter

1/2 cup of flour

4 cups of warm milk

1/2 teaspoon of salt

nutmeg, a pinch, optional

Melt the butter in a medium saucepan. Whisk in the flour and cook for about 5 minutes, until golden brown. Gradually add the warm milk, whisking continuously as you pour. Over medium heat, whisk constantly until it is thick and smooth, about 10 minutes. Do not allow to boil. Remove from heat and stir in the salt, nutmeg if using, and the grated cheese. Stir until all the cheese has melted and is well blended.

IMG_1586

IMG_1583

I thought I’d try mashing half of the roasted squash and adding it to the cheese sauce. Oh! It was so delicious! Cheesy with a slightly sweet taste to it. Might I make a suggestion here. If your little ones are picky, I would mash the whole thing up and throw it into the cheese sauce. They’ll never know it’s in there. Emma picked the squash chunks out of her pasta and then decided it was just perfect and quite to her liking. Next time, I’m mashing it all up!

IMG_1588

IMG_1589IMG_1591

I poured the cooked penne into a large oven pan and then stirred in the chesese-squash sauce. I added the remaining squash chunks and stirred gently. If you can manage not to have a small bowl of it before popping it into the oven, I commend you. Quite frankly, I would serve this up as it is, all creamy and yummy. But alas, I urged myself to add a handful of grated parmesan over the top and pop it into the oven, at 350 degrees F/180 C for about 35 minutes. It came out just as delicious! All baked and crunchy on the outside, soft and creamy on the inside. Just perfect! Or in Emma’s own words, as she sits by side feeling a little under the weather, “Be prepared for the goodness!”.

IMG_1598

IMG_1599IMG_1601

IMG_1603

IMG_1608

IMG_1611

IMG_1616IMG_1632

Share this:

  • Twitter
  • Facebook
  • Pinterest
  • Email
  • Print

Like this:

Like Loading...

Charlotte’s Ultimate Soup: Broccoli Cheddar

23 Saturday Mar 2013

Posted by ohlidia.com in Kid Friendly, Recipes, Soups & Greens, Vegetarian

≈ 27 Comments

Tags

broccoli, Broccoli Cheddar Chowder, Broccoli Cheddar Soup, broccoli soup, cheddar, kid friendly soups, Vegetarian

IMG_1340

Although in theory Spring arrived last Wednesday, March 20th, Mother Nature played a wicked trick on us here in Montreal. We were hit with a blizzard on Tuesday, with a record-breaking 36 cm/15 in of snow falling upon our city. And while some people thought it looked very pretty outside, all white and picturesque, I’d like to remind them that we are in the third week of March and NOT December! The ONLY good thing about the snowfall was that for a brief couple of days, the pot-hole-laden streets of Montreal were actually pleasant to drive on. Instead of feeling like I was driving through the Australian Outback, I actually felt like I was driving through the streets of a developed, industrialized country. Don’t get me wrong. I have driven through the Australian outback in a 4 x 4 and LOVED it! But I am in a city with supposedly paved streets, and my Mojita is not built for the Outback. In case you’re wondering, Mojita is my car and she is named after my favourite Summer cocktail, the Mojito. Only it’s Mojita because my baby is a she.

The other good thing about it still being Winter? Broccoli Cheddar Soup. Although it’s more of a chowder, really. Just last Monday, Charlotte mentioned that I had not made her ultimate favourite soup since last Winter. So last night, with the weather screaming for soup, I made this for her. For all of us. So yummy, I wonder how I got by this Winter without making it! And as I sit here writing this post, I’m staring out the window and watching pretty little snowflakes fall upon our city once again! Oh joy!

Broccoli Cheddar Soup

4 tablespoons of butter

1 large Vidalia, Spanish or sweet onion, finely chopped

1/2 cup of flour

6 cups of chicken stock, or vegetable stock for a vegetarian version

4 potatoes, peeled and cubed, about a 1/2 inch size

2 bay leaves

3 cups of milk, I use 1%

2 heads of broccoli, cut into florets, about 6 cups

3 cups of grated Cheddar cheese, I use strong or aged

Salt & Papper, to taste

IMG_1281 2

IMG_1290 IMG_1294 2 IMG_1298 2

You can use regular onions if that’s what you have, I like to use the sweeter onions because of their milder flavour. Same thing with the milk. I use low-fat because that’s what we have in our home, but feel free to use whatever milk is in your fridge.

In a large saucepan, melt the butter over medium heat. Add the onion and cook, stirring, for about 5 minutes. Sprinkle in the flour and stir. Add your stock, the potatoes and bay leaves. Bring to a boil, stirring often. You need to stir often otherwise the flour will settle on the bottom of the pan and the potatoes will stick to it. Trust me on this one! Once it begins to boil, reduce the heat to a simmer and cover. Cook for about 10 minutes, stirring occasionally. Add the broccoli and cook for about 8 to 10 minutes, until the vegetables are tender.

IMG_1299

Stir in the milk and cheese and just give it another 3 minutes or so to get hot. Do not let it come to a boil or it may curdle.

IMG_1303IMG_1305

Turn off the heat and remove the bay leaves. Give it a taste and season with salt and pepper. Some cheese may be saltier than others so you really need to give it a taste and adjust to your liking. Ladle soup, or chowder, into bowls and serve with some nice crusty bread. Mmmm, perfect on a cold winter’s night!

IMG_1328 IMG_1341

0.000000 0.000000

Share this:

  • Twitter
  • Facebook
  • Pinterest
  • Email
  • Print

Like this:

Like Loading...

Moroccan Lentil Soup for Bone-Chilling Weather

23 Wednesday Jan 2013

Posted by ohlidia.com in Recipes, Soups & Greens, Vegetarian

≈ 6 Comments

Tags

African, lentil, Moroccan, Moroccan lentil soup, soup, Vegetarian

IMG_3012

We have had bone-chilling weather these past 3 days. Arctic-like weather. It was -25 degrees Celsius today, -38 C with the wind chill factor! In case you’re wondering, that’s -36 Fahrenheit. Yes, really! We needed more than just a soul-warming soup for dinner. We needed a soup that would warm us to our very core. One with fiery spices which would make its way right down to our bones and set them ablaze with heat. Not necessarily hot spices, but spices with warmth. Spices like cumin, ginger, cinnamon, pepper and turmeric, a spice in the ginger family which is widely used in curries. How about a lentil soup with Moroccan heat?

IMG_2989

Ingredients for a big batch of soup, about 12 servings

Olive oil

1 large onion, chopped

4 cloves garlic, minced

1 tsp ginger, minced or grated

2 celery stalks, chopped

2 tsp salt

1 tsp each of pepper, ground cumin, ground coriander, cinnamon, turmeric

1/2 tsp ground ginger

1 to 2 tsp harissa, depending on your taste, optional

2 cups vegetable broth, or water

6 cups water

2 cups red lentils

1 tbsp tomato paste

1 can (28 oz/798 ml) whole, peeled tomatoes

Chopped parsley or cilantro for serving, optional

Sour cream for serving, optional

Heat olive oil, enough to cover bottom of soup pot, on medium heat.  Add onions and garlic and cook for 5 minutes. Add celery and cook another 5 minutes.

IMG_2987

IMG_2984

Add all of the spices, stir and cook for 2 minutes. Stir in harissa and cook for 1 minute.

IMG_2992

Add the liquids, lentils, tomato paste, and tomatoes. Bring to a boil, lower heat to a simmer, cover and cook for 30 to 35 minutes, mashing the tomatoes after 20 minutes.

IMG_3003

And that’s it, as simple as that. You can, if you like, top your soup with chopped parsley or cilantro, or sour cream. Or both. I did. Serve with crusty baguette and salted butter. It’s numbing cold out there, we need foods that will stick to our ribs. Enjoy and keep warm!

IMG_3025

IMG_3031

Share this:

  • Twitter
  • Facebook
  • Pinterest
  • Email
  • Print

Like this:

Like Loading...
← Older posts

Search Recipes

Recent Posts

  • Caipirinha – My Happy Drink during The World Cup
  • S’Mores Cake for a Birthday Girl
  • a momentary lapse of disconnect & A Jerk
  • I Heart Espresso S’Mores
  • Charlotte’s Chocolate-Toffee Popcorn

Recipes

  • For Starters
  • Soups & Salads
  • Mains
  • Sides
  • Vegetarian
  • Sweets
  • Baked Goodies
  • To Drink
  • Something Different

Cooking & Baking with Kids

  • Emma Bakes

Archives

  • June 2014
  • May 2014
  • February 2014
  • January 2014
  • December 2013
  • November 2013
  • October 2013
  • September 2013
  • August 2013
  • July 2013
  • June 2013
  • May 2013
  • April 2013
  • March 2013
  • February 2013
  • January 2013
  • December 2012
  • November 2012
  • October 2012
  • September 2012

Enter your email address to follow this blog and receive notifications of new posts by email.

Join 349 other subscribers

Blog Love

  • a pug in the kitchen
  • Bam's Kitchen
  • Cannelle et Vanille
  • david lebovitz
  • Eat Like a Girl
  • Fae's Twist & Tango
  • foodbod
  • from the Bartolini kitchens
  • frugal feeding
  • Gather and Graze
  • Hortus Natural Cooking
  • Mom's Kitchen Handbook
  • One Man's Meat
  • Please Pass the Recipe
  • smitten kitchen
  • Tartelette

Follow me on Facebook

Follow me on Facebook

Contact me privately

lspagnuolo@sympatico.ca

Blog at WordPress.com.

  • Follow Following
    • ohlidia
    • Join 239 other followers
    • Already have a WordPress.com account? Log in now.
    • ohlidia
    • Customize
    • Follow Following
    • Sign up
    • Log in
    • Report this content
    • View site in Reader
    • Manage subscriptions
    • Collapse this bar
 

Loading Comments...
 

    %d bloggers like this: